YouTube Shorts Guide Tips and Tricks get Money from Your Phone
Take your phone and let's get started with YouTube Shorts tutorial below :
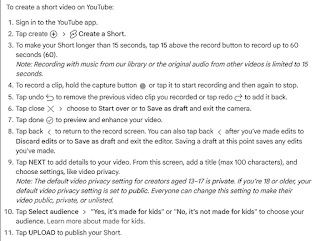
1. Open YouTube app and at the bottom create short by record 15 seconds, to 60 seconds
2. Tap V and create tittle details your video, than select audience.
3. Publish your Short and ready to earn money from youtube views
YouTube Shorts Guide Tips and Tricks get Money from Your Phone
To make money on shorts videos you must be eligible get a bonus by follow our guide and tips below YouTube Short Tips and Tricks:
1. Follow the Community Guidelines, copyright rules, and monetization policies.
2. Never use watermarks or logos from third-party social media platforms, non-original videos
3. Don't reuploaded from another creator’s
4. Set up an AdSense account to collect bonus and money from Youtube.
Take a look your county on the list below:
Powerful TikTok videos for anyone happy to connect with a new audience no shorts give you using just a smartphone camera in the YouTube app. The additional tools makes it easy to create short-form videos edit add emoji, note add musics etc that are up to 60 seconds long with our multi-segment.
How to Fix Firefox Profile Missing After Update - If your Mozilla Firefox profile missing after refresh and had try to restore but there are still to show, read our guide to resolve Firefox problem today.
How to Fix Firefox Profile Missing After Update
After Google update privacy and policy many web browser update new algorithm. Firefox, the world’s largest public resource for future generations Mozilla update privacy and policy to protect and creates powerful web tech for everyone. But after Update Firefox to the latest version, Profile are missing. It's very sad and make terrible, All data, user name, password, bookmark and important website gone, your Firefox profile cannot be loaded.
Firefox Profile
Advertisement
Firefox stores your personal information and settings in a profile folder. These data location on your disk = C:\Users\Computer\AppData\Roaming\Mozilla\Firefox. (View details file and show all hidden files) the record to Restore Firefox Profile.
How to Create Firefox Profile
Follow Bumen Media Guide
Right Click on Firefox short cut, Choose Properties
Change the Shortcut with "C:\Program Files\Mozilla Firefox\firefox.exe" -p -no-remote
Click OK to save
Now you can Create User Profile
How to Fix Firefox Profile Missing After Update
If you have latest Firefox problems there are no profile, Follow our Tips and Tricks to restore Firefox profile
1. Go to C:\Users\Computer\AppData\Roaming\Mozilla\Firefox.
2. There are Profiles.ini File and Profiles Folder
3. Open Profiles Folder and you will see your saved profile
Enjoy your day Mozilla more power for you now and puts people before profit, creating products, technologies and programs that make the internet healthier for everyone.
How to Fix Mozilla Firefox Problem Adsense Login - The latest Firefox update has an issue on https accces website or login Gmail, Blooger also problem Adsense login hmm. we're having trouble finding that site firefox error.
How to Fix Mozilla Firefox Problem Adsense Login
Some one ask is Firefox having problems today to access https and Firefox cannot login gmail.
Advertisement
How to Fix Mozilla Firefox Problems
Mozilla firefox problems after and Google privacy policy update based on (GDPR) General Data Protection Regulation for privacy laws about to go into effect on Wednesday (April 25). One of the Europe key rules in the companies must provide clear and transparent notice about how your data will be used. Most Google advanced security features makes changes and it's problems with Firefox not responding after update.
What's wrong with Firefox today
All website that use an online data had an effect about Google updated version for Privacy Policy on May 25, 2018. Some browser (Internet Explorer, Opera, UCbrowser, Safari, and other) cannot access Google product. Firefox set automatically to checking for updates and downloading to the latest versions, but what is wrong with firefox lately?
Firefox cannot access gmail
If Firefox cannot access gmail or you got any problems for the latest update, to fix the latest problems on your web browser, you can un install and download the latest versions for Firefox get the safe download link from the official Mozilla links to avoid malware.
Firefox Problem Adsense Login
For now may you can access Gmail but can not login into Google Adsense dashboard and for now there are also a latest Adsense privacy policy update that you must agree to use it features.
If you had the latest Firefox update but "hmm we re having trouble finding that site firefox" when log into Adsene, Blogger, Gmail or another website using https problem, for publisher may also use a Firefox profil had the same issue, you can follow our guide and tutorial below to fix your Mozilla problem:
Another way to Fix Mozilla Firefox Problems
Advertisement
1. Open your Mozilla Firefox browser
2. Go Firefox download or via https://www.mozilla.org/en-US/firefox/new/
3. Choose Refreh Firefox to update the latest versions. ( This tips tested and work in our browser and will replace new instalations without loosing your saved data)
4. After update and restart, please close it.
5. Clear your browser chache and now open the latest Firefox instalations and Signin to Gmail, Blogger or Adsense.
6. If our guide tips and tutorial usefull and works you free to share with your friends or comment below!
Samsung Galaxy J7 Review Audio Video Recording - Read our review about Samsung Galaxy J7 2017 and learn how to create a home recording studio using this Galaxy from Samsung with our tutorial tips and tricks most out usefull for you.
Samsung Galaxy J7 Review Audio Video Recording
Galaxy J7 2017 come in multiple series, this models available Samsung Galaxy J7, J7 Prime, J7 Pro, and Samsung Galaxy J7+. What are they? Of course confusing to choose the minimum budget to but buy Galaxy J7 Indonesia IDR2,450,000 - IDR4,819,000, global price $466.64, cost in India Rs. 15990.
Samsung Galaxy J7 2017
The full specification you can read below on table. You can compare both and see what the different.
We try to buy Galaxy J7 Pro SM-J730G/DS, 32 Gb in Indonesia IDR 3,799,000. After unboxing we got the device built in full metal design, battery charger 1.5A, headphone jack, ejection pin and a guick sart guide. The user manual get on samsung official website.
Galaxy J7 Plus Review
The most diffent on Galaxy J7 models is the camera. J7+ dual camera and support soft blurring for an artistic touch. While using the Live Focus mode, you can take high-quality portraits and blur the background and focus of your subject. Adjust blur levels before or after photographing your objects.
The speakers on the J7 Pro only one on the top side of the phone, mic only one in the buttom near the micro usb jack, and headphone jack. This phone support dual sim and external memory up to 256GB.
Galaxy J7 Audio Video Recoding
While use to record a live sound using the built in microphone, or upload your recording to YouTube to get money, live audio sound in high midle good but in the bass sound low frequency the inside mic can not recieved the low frequency, sound got bad, different when we use Galaxy Note 8 it's able to accept it sound.
Advertisement
The low light mode in Galaxy J7 features most usefull to us while recording on my village in the dark of night. While driving we try to use J7 as a dashcam using car phone clamp over 2 hours online recording the battery still good, but using the HD mode/ pro mode the video size become large and make our external memory 32GB full, so if you use this phone to recording we suggest to install 256GB inside of your J7 in high class and using a good brand to keep Galaxy J7+ performace. Because we had lost our document while using cheap microSD and get stuck while in use and con not recovered.
If you need to great audio like a pro using this phone, please record the audio using the microphone line on the headphone jack, and combine your strero into mono using the handphone jack splitter. Its usefull to insert audio line and the port headphone audio out become two line. Now the low frequency can recorded into great sounds like a pro.
If you only record an audio you can use voice recording app in this phone, or download another audio record from playstore.
Manual to recordings using Voice Recorder app
1. Connect audio input into headphone jack splitter
2. Open the Samsung folder and launch the Voice Recorder app.
3. Tap to start recording.
4. Tap to finish recording.
5. Enter a file name and tap SAVE
You can play the recorded auido by open the voice recorder app and see the recording list, just tap to play. If you an advaced you can explore your Samsung android file, check file location on internal or external, go to voice recorder folder and play.
The auto focus J7 not bad, our tips: you just more slowly to move your phone to get the focus in auto mode.
How to Record Audio Using a Smartphone (Android/iPhone) - The simple way recording an audio from mixer use your own mobile phone, an iPhone or Android devices. Learn here how to record in a minute, equipment to record and consider these quick recording tips to record audio on your smartphone.
How to Record Audio Using a Smartphone (Android/iPhone)
Smartphones like an iPhone or an Android phones have changed the way of life when people share photos and videos also for an audio too. iPhone 13 pro max, iPhone x, Samsung Galaxy ultra, Samsung Galaxy Note 10, Nokia X100 5G, OnePlus 5T, HTC U20 pro, Google Pixel 6 pro, Moto G22 Plus, Asus Rog phone ZenFone 3 Zoom, LG V60 an another brands with excellent feature from the latest models.
How do I record on my iPhone
Take a minute to think about what you’d like to record on your iPhone, and consider these quick tips to record audio on your smartphone to get the best recording with our guide.
iPhone Tips to Record
Before recording begin you must learn about your hardware device and the next is a recording software. Most iPhone microphones are located on the back of the phone, near the bottom of the handset, the new Apple iPhone X mic location also on the bottom together besides the stereo speakers.
When you begin recording, you'll need to point the telephone's mouthpiece toward the individual speaking.If you're holding the cell phone, ensure your hand isn't covering the mic.
In case you can make a simple home recording studio with your phone and your own particular voice, it's additionally a smart thought to keep a sensible separation between your mouth and the amplifier to guarantee you catch a reasonable sound account.
Record using Voice Memos on iPhone and iPod touch
Advertisement
Make voice notices with your gadget's worked in mouthpiece, a wired or Bluetooth headset, or a perfect amplifier. At that point you can share and alter your work.
Voice Memos application
Voice Memos utilizes your gadget's worked in receiver when you record. For a higher-quality stereo chronicle, utilize an outer stereo amplifier that works with your iPhone.
Voice Memos on iPhone
The most effective method to record a voice reminder
Find and open Voice Memos or request that Siri open it.
To record, tap Red circle symbol. To delay, tap Red square in dark circle symbol. Figure out how to alter.
When you complete, tap Done.
Name your voice reminder, at that point tap Save.
Need to impart your voice reminder to a companion or spare it to a moment area? Tap the notice, at that point tap . To send to a companion, pick an approach to share, as through Messages or an online networking application. To spare your update to another area, pick an alternative like iCloud Drive or Mail.
If you can't discover the Voice Memos application? From your Home screen, swipe ideal until the point when a screen shows up with a Search bar at the best, at that point enter Voice Memos in the Search bar. Still don't see the application? You may have expelled it. Figure out how to reestablish an application that you evacuated.
Alter a voice notice
Figure out how to see, rerecord, trim, and the sky is the limit from there.
Play
Tune in while you alter
To stop you recording, tap .
Swipe left or directly finished the blue line until the point when it denotes the point that you need to tune in from.
At that point tap and you can tune in starting there.
Record
Rerecord part of a voice update
In case you're recording, tap Red square in dark circle symbol, which stops your work. On the off chance that you need to alter a spared update, open Voice Memos, tap the reminder, at that point tap Edit.
Swipe left or directly finished the blue line until the point when it achieves the start of the part that you need to record over.
Tap when you're prepared to rerecord.
Tap Red square in dark circle symbol when you wrap up.
Alter voice notices on iPhone
Alter
Trim from the earliest starting point or end of a notice
To alter as you record, tap , which stops your work. To alter a spared reminder, open Voice Memos, tap the update, at that point tap Edit.
Swipe left or directly finished the blue line until the point when it marks where you need your update to begin or end.
Tap . Two red lines show up. Your blue line doesn't move.
To trim from the earliest starting point, drag the furthest left red line and drop it on the blue line. To trim from the end, drag the furthest right red line and drop it on the blue line.
Tap Trim. To affirm, tap Trim once more.
Tap Done, enter a title, and tap Save.
Erase some portion of an update
To alter as you record, tap , which delays your work. To alter a spared reminder, open Voice Memos, tap the update, at that point tap Edit.
Swipe left or directly finished the blue line until the point when it denotes the start of the part that you need to erase.
Tap Blue square-like symbol. Two red lines show up. Your blue line doesn't move.
Drag the furthest left red line and drop it over the blue one.
Drag the furthest right red line and drop it toward the finish of the part that you need to erase.
To erase the part between the red lines, tap Delete, at that point tap Delete From Original.
Erase
Erase a voice update
Open Voice Memos.
Tap the update that you need to erase.
Tap Trashcan symbol, at that point tap Delete ["title"].
Take chronicles and exchange them to your PC
How to Record Audio on my Android Phone
Some Android gadgets, similar to the Samsung Galaxy S8, Galaxy Note8, Galaxy S7
accompany a voice recording application pre-introduced.
Recording Tutorial
Advertisement
Hit the red record catch when you need to begin the account, and afterward indeed to stop it. From here, you can hit the catch again to keep recording, or spare the document to your chronicle file.
On the off chance that you need to exchange your short chronicles to your PC, just send the sound record to yourself by means of email, open the email on your PC and download the document. For longer accounts, you can interface your cell phone to your PC by means of a USB link to exchange the records.
Tips for recording sound
You would prefer not to get a telephone call while you're endeavoring to record, so switch on your telephone's off-line mode before you squeeze record.
Locate a pleasant, calm room. A bistro or a boisterous eatery isn't a perfect area, however in the event that you have a telephone like the LG V30 which has a computerized amplifier that catches sound without contortion, you can catch a decent account even in uproarious conditions.
Check for wind. Indeed, even a mellow breeze blowing straightforwardly into a delicate amplifier can overwhelm the sound of somebody talking. In the event that you should be outside, move some place out of the breeze.
Rather than talking boisterously, attempt to get nearer to the commotion source. This will make a more close and normal sound.
Applications to go sound master
There are a few applications that take your cell phone's voice recording capacities to the following level:
Shrewd Voice Recorder is intended for high caliber, extensive voice chronicles. It additionally consequently skips relative hush, so you can record your flat mate who is continually talking in his rest!
Tape-a-Talk Voice Recorder considers simple adjusting to Dropbox, so you can get to your sound documents on your PC and offer them with companions, family or associates. You can likewise delay, rewind and quick forward from inside the application, so there's no strain to get the ideal account on your first take.
Voice Recorder has a simple pursuit work with the goal that you can discover past accounts by title or date, and it likewise makes it simple to send documents through email or utilize your chronicles as ringtones.
How to record Music on your phone clearly?
To record musics or sound clearly using your phone, use external mic connector based on your device, and iPhone or Android phone with a headphone jack or use external microphone connector no headphone jack.
The next step connect with a RCA jack or an XLR to external mic connector try to adjust the volume level to get the best and clearly sound when you record using a recording app or a simple just use voice recorder.
If you need a stereo sound for now your phone until we know just 1 microphone line / mono audio input. You can combine the stereo input into mono using microphone splitter adapter for your phone and audio mixer interface.
Audio Interface Sample: ROLAND USB Audio Interface Mackie Onyx Artist FOCUSRITE SCARLETT Steinberg TASCAM Mixcast BEHRINGER U-Phoria Roland Rubix M-AUDIO Alctron U12 and more
Hope you enjoy to get clearly musics on your phone with your own record.
How to Simple Home Recording Studio - Learn here how to set up simple home recording studio from your living room from beginner's like a pro. Prepare your room to create a smart studio with our guide to recording a video that you can upload on YouTube with a great audio using your laptop/pc or your smartphone Android or an iPhone and next you can monetize with a Google Adsense.
How to Simple Home Recording Studio
What you should to prepare before make a home recording studio? Focus on the equipment that must be used to minimalist a cheap studio but great feature. Here simple perfect recording studios our home recording equipment guide:
Recording Equipment:
1. Audio Recording Equipment
a. PC/Laptop/Phone
b. Audio Mixer
c. Microphone
d. Recording Cable
e. Recording Software
2. Video Recording Equipment
a. Handycam/Camera/Phone Camera
b. Lighting Studio
c. Backgound
Recording Studio Guide
After you read the equipment that must be prepare, now you can choose with a cheap budget and great fatures that usefull to record in your sudio.
1. Audio Recording Equipment
a. PC/Laptop/Phone
i. If you choose a PC, please use with a high specs, but if no budget, you can choose the minimalist PC that your own, upgrade with soundcard, and memory into 4GB RAM/ 3GB still enaough.
ii. Laptop more usefull, you can make a live recording too, with i3 processor you can do the recording better use an i7 and 4GB RAM.
iii. Phone is a smart device, it's can record an audio and video, but the phone that i used only can record a mono audio, the external mic or input line just 3 line, 1 for mic, and stereo (2) for earphone. If your is different, comment please to share with each other.
b. Audio Mixer
i. Analog Audio Mixer able to control analog or digital signals. The modified signals are summed to produce the combined output signals, which can then be broadcast, amplified through a sound reinforcement system or recorded. Mixing consoles are used in many applications, including recording studios, open address frameworks, sound fortification frameworks, dance club, move clubs, broadcasting, TV, and film after creation. A commonplace, straightforward application consolidates signals from two receivers (each utilized by vocalists singing a two part harmony, maybe) into an enhancer that drives one arrangement of speakers at the same time. In live exhibitions, the flag from the blender typically goes specifically to an intensifier which is connected to speaker cupboards, unless the blender has a worked in control enhancer or is associated with fueled speakers.
When using an analog mixer, record using audio out port / using line out or a main audio out. Connect with RCA cable into your recorder.
This is our video using Behringer QX1222USB to recording using a usb cable and RCA cable, record with Audacity
See more video on YouTube and subscribe Bumen Media.
The semi digital is better than analog, semi digital mixer use a usb cable interface into pc/laptop to record. The sound quality minimalist a noise from analog with digital audio interface.
This a live concert that we try lo record using the Behringer QX1222USB
Tips Audio Recording
A simple tips and tricks while recording an audio, better to make a ground connections. Brooming humming, noise can reduce by make a ground cable. Ensure your electric cord/power cord use three wire (+,0,and ground). The ground cable made by brass wire, connect using cable into mixer body (ground port).
ii. Digital Audio Mixer is an electronic gadget used to consolidate, course, and change the elements, balance and different properties of numerous sound information signals, utilizing advanced PCs as opposed to simple hardware. The computerized sound specimens, which is the inner portrayal of the simple information sources, are summed to what is known as an ace channel to deliver a consolidated yield. An expert advanced blending console is a committed work area or control surface delivered solely for the errand, and is regularly more hearty as far as client control, preparing force and nature of sound impacts for best digital mixer for live sound. Maybe a PC with appropriate controller equipment can go about as the gadget for the advanced blending console since it can mirror its interface, info and yield. A new recording era in an audio interface combined with digital audio workstation / DAW is the digital mixer software used to record, edit, and mix music on your computer.
c. Microphone, mic or mike is a transducer that converts sound into an electrical signal. There are a condenser and dynamic.
The condenser microphone capacitor amplifier or electrostatic receiver, capacitors were generally called condensers. Here, the stomach goes about as one plate of a capacitor, and the vibrations create changes out yonder between the plates. There are two composes, contingent upon the strategy for removing the sound flag from the transducer: DC-one-sided amplifiers, and radio recurrence (RF) or high recurrence (HF) condenser mouthpieces. This condenser mic thing better to record a voice and high percussion device.
The dynamic mouthpiece (otherwise called the moving-curl amplifier) works by means of electromagnetic enlistment. They are hearty, generally reasonable and impervious to dampness. This, combined with their conceivably high pick up before input, makes them perfect for in front of an audience utilize.
d. Recording Cable
What a recording cable to use? here they are:
1. RCA Cable (RCA connectors and cable are also commonly used to carry S/PDIF-formatted digital audio, with plugs colored orange to differentiate them from other typical connections. Connections are made by pushing the cable's plug into the female jack on the device.)
2. Mic Cable (using a canon jack or XLR, thing a good use an XLR)
3. USB Cable (There are several types of USB connector, including some that have been added while the specification progressed. The original USB specification detailed standard-A and standard-B plugs and receptacles; the B connector was necessary so that cabling could be plug ended at both ends)
e. Recording Software
1. Audio Recording Software
A Softare tools to record your audio into file using. Use an Audacity because it's free, open source, cross-platform audio software for multi-track recording and editing. Audacity is available for Windows®, Mac®, GNU/Linux® and other operating systems. Get free audio recording software, music recording software, professional recording studio software free download.
Choose the right Digital Audio Workstation is first step in the best daw for beginners is a process of building a software-based music production studio. After all, the DAW is the central part of any virtual studio setup, where all the audio recording, editing and mixing takes place. The best way to create digital home recording studio is to use a digital audio workstation (DAW). Get started to learn how to use Digital Audio Workstation and get digital audio workstation free download from the best daw software.
Advertisement
2. Video Recording Software
The video editing software help you edit and create amazing viewer after you grow up from beginners to advanced as a master. See the video editing software free download, professional video editing software free download, best video editing software for Windows, Mac. Linux for you.
2. Video Recording Equipment
a. Handycam/Camera/Phone Camera
This video we made using Panasonic camcorder MDH2 and record the audio using Samsung Galaxy Note 3 by plug an RCA cable from audio output mixer into audio port on Note 3 and hope next can do more using Galaxy Note8 or iPhone 8. May be anyone will sent a give away to support, you can sent via contact or see our location on Google map, big thanks.
b. Lighting Studio
The light make a video better, use a bright lighting with no shadow.
c. Backgound for Home Recording Studio
Use a background to coloring your video, because people need a good view.
We hope these simple guide for home recording studio hope you can streamin on YouTube better and record your live and get money from home.
How to Make a Blog and Custom Domain - Learn how to create a blogspot with free user guide tutorial tips and tricks to custom domain make your blogspot into website.
How to Make a Blog and Custom Domain
Here a free Google tutorial from beginners to advanced in our ultimate guide. You can save this article into pdf as iBook to read on your iPhone or an Android smartphones. Lear more about Google Adsense mobile guide and tutorials.
How to Make a Blog
Lets get started a Blogspot, Sign in to Blogger, as well as a list of Facebook, the blogger must also have a Gmail email first, who do not have Gmail email, please make first. To register, please fill in the Gmail email name and password, just like logging in to gmail.com.
Enter the name of the email / Gmail with the password, then click Sign In, and Crete blog
Fill in the title and address of the blog with the name of the blog as you wish, and If already filled the blog address then there will be writing underneath This blog address is available, if not my friend can change the name of other blogs like labtamandewasakebumen or up buddy. Well, if you have now just choose a template or blog view, select according to your pal. For the template can be changed again so choose if you feel nothing good, select any course. After finished make the article just click publish
Publish a Blog
after finished making the article just click Publish
Check your Google console, webmaster tool and add url submit if need fast index in Google search.
Create a blog into Website
As a Blogger, your blogspot can also easily become a website. Website (English: website) is an interconnected webpage that generally resides on the same server containing a collection of information provided by individuals, groups, or organizations in this lesson you can check out a custom domain in StreamingYouTube. A website is usually placed at least on a web server that can be accessed through a network such as the Internet, or a local area network (LAN) through an Internet address identified as a URL. The combination of all publicly accessible sites on the Internet is also called the World Wide Web or better known as WWW abbreviation. Make a website can you visit websire service providers and also download tutorial how to create a website that is easy to understand beginners, from start to so website, with free help can even make money by registering blog to google adsense.
Website History
The inventor of the website was Sir Timothy John "Tim" Berners-Lee, while the first web-connected website appeared in 1991. The purpose of the Team when designing the website was to facilitate exchange of information and updates to fellow researchers in the workplace. On April 30, 1993, CERN (the place where the Team worked) announced that the WWW could be used free of charge by the public.
A website may be the work of individuals or individuals, or show ownership of an organization, company. usually the discussion in a website refers to a particular topic or topic, or a particular interest. A website may contain links linking to other websites, as well as with other websites. This sometimes makes the difference between individual and individual websites with websites created by business organizations becoming less obvious.
Websites are usually placed on a web server. A web server is generally equipped with special tools for handling domain name settings, as well as handling services over the HTTP protocol called HTTP Server (English: HTTP Server) such as Apache HTTP Server, or Internet Information Services (IIS).
Domain
Domain is the address of a website, in fact the address of the sites that exist on the Internet is the basic form of numbers, for example 17.125.135.147 if this number is typed in the address bar in the web browser it will open the Google website, another example 72.30 .38.140 if this is typed it will open Yahoo. The use of these numbers is often called an IP address when it is actually a domain address.
Domains using words aim to make their use easier to remember than to memorize long sequences of numbers. Therefore, Internet experts make the domain naming system in the form of words to substitute the sequence of these numbers.
Portions of the domain. namely the domain name and extension (extension) used behind the domain name.
url google search
For example: wikipedia.org which is the domain name is wikipedia and the extension used is .org. Initially, domain extensions are not so much, now domain extensions have been very many of them (.com, .edu, .co.id, .gov, .org and so on). Providing an extension to a domain should not be arbitrary especially for .edu, .gov, .go.id and various extensions that are reserved for educational and government institutions only.
Domain Example TLD:
.com: used for commercial or corporate purposes.
.net: used for the benefit of network infrastructure.
.org: used for the benefit of the organization.
.info: used for the informational benefit of the website.
.name: used for the benefit of family or individual.
.edu: used for educational purposes (limited to education only).
.mil: used for military purposes (limited only to military)
.biz: used for business purposes.
.tv: used for entertainment such as television, radio, magazines, and others.
.travel: used for the benefit of tourism business.
How to Turn Blogspot into a Website
The website name (called domain) can be specified by yourself. After we buy the next domain name we change blogspot into a website (com, xzy, tk, us, press, tv, tube, info and others.) Get your domain with a coupons and promo code.
How to Custom Domain from blogspot
Go to your blog's basic settings
Check Blog Address Publications + Set up 3rd party URLs for your blog - Redirecting your registered URL to your blog. Do not have a domain? Buy Domain.
Click on the 3rd party url and enter the domain name with www or non www.
After that came the custom domain from blogspot to website in the form of www code, ghs.google.com and unique code domain and unique code url website you will install on domain service provider.
Save
If successfully saved means you can already turn blogspot into a website with custom domain as you wish.
Blogspot Can Make Money
If you are diligent in writing and read many articles even occupy page 1 (pageone) in Google search, God bless you and will easily to earn money. The next tips and tricks is how to register the website / blog to Google Adsense. Want to know more to be able to live with payday from Google? Follow in the next article.
How to Buy Domain or Domain Registration in NameCheap with Tutorial - In this article, we will provide NameCheap buying guide and tutorial, of the process of purchasing or registering the domain NameCheap up to its payment transactions and get smart price(NameCheap Coupons, Promo Code, NameCheap Buying Guide) with a discount from NameCheap Coupons. New domain registration including hosting account can register new domain (or deleted domain/) renew domain, directly to the domain registrar.
How to Buy Domain or Domain Registration in NameCheap with Tutorial
Namecheap is a company engaged in registration services and sales of domain names and web hosting that has been accredited by ICANN. The Namecheap office itself is based in Los Angeles, California. In general, the new domain registration process (including deleted domains) on all registrar can be said the same.
NameCheap Turorial
The differences we often encounter include: availability of TLDs, prices, promos / discounts, payment instruments, and delivery times. Similarly, about expired domains, although each registrar has their own system and policies about expired domains in their registration, but in general the purchasing and re-registration process is almost the same. Here is an example of a Domain Registration step (new / deleted) directly to namecheap hosting.
How to Buy a Domain in NameCheap
Here the tutorial to order domain / buy a new domain in NameCheap:
Open the web namecheap in your browser, www.namecheap.com.
For those who already have an account, please SIGN IN, and go, for those who have not, click SIGN UP.
After the contents of dashboard namecheap form completely, click Create Account and Continue.
No email verification, but you still need to use VALID email.
After entering the dashboard, select / highlight the Domains menu and click Registration.
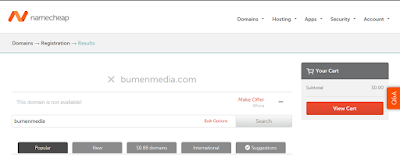
Enter the domain name you want to buy, then click Search.
How to Register Domain in NameCheap
If the domain you want is not available, edit / rename your domain.
If the desired domain is still available (available), click the shopping cart icon to buy it. But you must get namecheap login by register.
Once the domain is in your cart, click "View Cart".
NameCheap Coupons
You are now on the Shopping Cart page. You can see that we will register domain. Com for 1 year (1 Year), the price $ 10.69, there is a fee ICANN fee $ 0.18, and already include WhoisGuard FREE! a year (1 year subscription).
If you have a NameCheap Promo Code, please enter in the available fields and click "Apply". If you are sure, just click "Confirm Order" to continue the purchase.
You will then be prompted to fill out "Account Contact Information" (new account only / not contents data).
Please complete the contents of your data. Uncheck the "I'm registering on behalf of a company", if you register not on behalf of the company.
After all data is complete (columns with arrows), please click Continue.
The next page in how to buy a domain in NameCheap is Whois Contact Information. Click Continue to continue.
Next you are asked to select and fill the data "Payment Method" that you will use. There are 3 choices of payment methods in NameCheap, namely:
Secure Card Payment,
PayPal,
Account Funds.
NameCheap Buying Guide
In this example we select PayPal as the payment method. Once we select PayPal as our payment method, click Continue to continue.
A quick review of your order, then click. Wait loading for a while, you will redirect to the PayPal page.
Wait loading for a while, you will redirect to the PayPal page.
Once connected with PayPal, enter your PayPal Email and Password, then click Log In.
Finally, click Continue when you are asked for review once again.
Congratulations on How to Buy Domain or Domain Registration in NameCheap web hosting Success with tutorial tips and tricks. The domain TLD purchased with namecheap coupons works!
Google Adsense Mobile Guide and Tutorial - Google Search has adapted new Google algorithms to help users find Google mobile-friendly web pages and apps. We guide to make sure visitors have a good experience on your site when visiting from their mobile devices.
Google Adsense Mobile Guide and Tutorial
Learn our this Google Adsene Guide get the best practices to provide your visitors a good user experience and to make most of your mobile traffic. New Google algorithms and search about 61% of people will leave a mobile site if they don’t see what they are looking for straight away and 21% of internet users globally only use their smartphone to access the internet. How about your site?
Google Mobile Guide
Make it Mobile Friendly Websites and easy access for your Mobile user
Ease of use
Include logo or company name on every page that links back to the home page
Touch friendly
Reclaim space by hiding the URL bar
Font size•
Configure the viewport & Size tap targets
Google Adense Tutorial Mobile Devices
When a page does not specify a viewport, mobile browsers will render that page at a fallback width ranging from 800 to 1024 CSS pixels. The page scale factor is adjusted so that the page fits on the display, forcing users to zoom before they can interact with the page.
Configure the Viewport
A viewport controls how a webpage is displayed on a mobile device. Without a viewport, mobile devices will render the page at a typical desktop screen width, scaled to fit the screen. Setting a viewport gives control over the page's width and scaling on different devices. This rule triggers when PageSpeed Insights detects that your page does not specify a viewport, or specifies a viewport that does not adapt to different devices.
Pages optimized to display well on mobile devices should include a meta viewport in the head of the document specifying width=device-width, initial-scale=1.
<meta name=viewport content="width=device-width, initial-scale=1">
Google Pages Optimized:
Hardware pixel: A physical pixel on the display. For example, an iPhone 5 has a screen with 640 horizontal hardware pixels.
Device-independent pixel (dip): A scaling of device pixels to match a uniform reference pixel at a normal viewing distance, which should be approximately the same size on all devices. An iPhone 5 is 320 dips wide.
CSS pixel: The unit used for page layout controlled by the viewport. Pixel dimensions in styles such as width: 100px are specified in CSS pixels. The ratio of CSS pixels to device independent pixels is the page's scale factor, or zoom.
Meta Viewport Tag
A meta viewport tag gives the browser instructions on how to control the page's dimensions and scaling, and should be included in the document's head.
Fixed-Width Viewport
The viewport can be set to a specific width, such as width=320 or width=1024. While discouraged, this can be a useful stopgap to ensure pages with fixed dimensions display as expected.
Responsive Viewport
Using the meta viewport value width=device-width instructs the page to match the screen's width in device independent pixels. This allows the page to reflow content to match different screen sizes.
Some browsers, including iOS and Windows Phone, will keep the page's width constant when rotating to landscape mode, and zoom rather than reflow to fill the screen. Adding the attribute initial-scale=1 instructs browsers to establish a 1:1 relationship between CSS pixels and device independent pixels regardless of device orientation, and allows the page to take advantage of the full landscape width.
Avoid minimum-scale, maximum-scale, user-scalable It is possible to set the minimum and maximum zoom, or disable the user's ability to zoom the viewport entirely. These options negatively impact accessibility and should generally be avoided.
The meta viewport tag, while broadly supported, is not part of a formal standard. This behavior is being included in CSS as part of the CSS Device Adaptation specification. Until this specification is finalized and widely implemented, authors should continue to use the meta viewport tag for compatibility, either alone or with corresponding viewport styles.
Size Content to Viewport
This rule triggers when PageSpeed Insights detects that the page content does not fit horizontally within the specified viewport size, thus forcing the user to pan horizontally to view all the content.
On both desktop and mobile devices, users are used to scrolling websites vertically but not horizontally, and forcing the user to scroll horizontally or to zoom out in order to see the whole page results in a poor user experience. When developing a mobile site with a meta viewport tag, it easy to accidentally create page content that doesn't quite fit within the specified viewport. For example, an image that is displayed at a width wider than the viewport can cause the viewport to scroll horizontally. You should adjust this content to fit within the width of the viewport, so that the user does not need to scroll horizontally.
Since screen dimensions vary widely between devices (e.g. between phones and tablets, and even between different phones), you should configure the viewport so that your pages render correctly on many different devices. However, since the width (in CSS pixels) of the viewport may vary, your page content should not rely on a particular viewport width to render well.
Avoid setting large absolute CSS widths for page elements (such as div{width:360px;}), since this may cause the element to be too wide for the viewport on a narrower device (e.g. a device with a width of 320 CSS pixels, such as an iPhone). Instead, consider using relative width values, such as width:100%. Similarly, beware of using large absolute positioning values that may cause the element to fall outside the viewport on small screens. If necessary, CSS media queries can be used to apply different styling for small and large screens. This Web Fundamentals article provides further recommendations on how to go about this.
Test your Mobile Friendly Websites
Pick the metrics that are most important to you and your users and experiment with them. From smartphones and tablets to laptops and television, 90% of all media interactions today are on a screen. Businesses that allow users to interact with their brand across all platforms and on all devices are able to generate more engagement. Many publishers have trouble identifying areas of their sites that need work. Google tutorial identifying Mobile Friendly Websites:
Social Sources
Shares
Page Speed and load time
Engagement
Direct Traffic
Page Speed and load time
Time on site
Page views per visit
Be consistent acrossscreens Make it easy for your users to find what they’re looking for no matter
what device they’re using:
Web Fundamentals: Best practices for a great multi-device web
Google Multi-screen Guidelines
Multi-Screen Starter Guide
Google Multi-Screen Starter Guide is for publishers who want to learn why a Adsense multi-screen strategy is important, and how to start building immediately. Google Multi-Screen Implementation Guide is for those who have already built a multi-screen site, and provides monetization tips, user experience tips, and more on how to maximize your mobile audience. Let’s get started Google Adsense Multi-Screen Implementation Guide to grow audience and boost revenue from your multi-screen site:
Monetization tips
Mobile user experience tips
Mobile search engine optimization tips
So, make sure your site's ready for mobile-friendly Google search results
Optimizations for the mobile Web
New Google Search will be expanding its use of mobile-friendliness as a ranking signal. This change will affect mobile searches in all languages worldwide and will have a significant impact in Google Search results. Users will find it easier to get relevant, high quality search results optimized for their devices.
PageSpeed Insights: A free tool that analyzes the content of a web page then generates suggestions to make that page faster.
Device Mode and Mobile Emulator:
Device mode brings the insights of mobile testing to your browser tab through the power of mobile emulation
Make images zoomable on tap or pinch to zoom & use lazy loading
Make sure your website is ready for this new Google search change, this change will affect mobile searches in all languages worldwide.
Google Tutorial to check Mobile-friendly Website
You can check your site by testing your pages with the Mobile-Friendly Test tool.
This tool shows how Google Search sees your pages. To get a list of mobile usability issues across your sites, log in to your Search Console account and use the Mobile Usability Report.
Get started Adsense mobile-friendly sites to build your mobile-friendly site. Ensure your site is designed for your mobile users, and your ads should be too. Bumen Media website is already mobile-friendly. If you already have a mobile-friendly site:
Double-check your site’s pages using the Mobile-Friendly Test tool and see how Google Search sees your pages.
Learn about growing audience and revenue from your site.
Use the Mobile Search Engine Optimization to help your site show up in search results.
Go mobile today to provide your visitors a good user experience and to make most of your mobile traffic.
Google Mobile SEO
Let's make sure your site shows up in search results. Here you can learn Google SEO mobile how to configure your site for multiple devices and help search engines understand your site.
Choose your Mobile Configuration
There are three main techniques for implementing a website that can handle view screens of all types and sizes. Here’s a the Google mobile configuration methods:
Responsive Web Design
Serves the same HTML code on the same URL regardless of the users’ device (desktop, tablet, mobile, non-visual browser), but can render the display differently (i.e., “respond”) based on the screen size. Responsive design is Google’s recommended design pattern.
Dynamic Serving
Uses the same URL regardless of device, but generates a different version of HTML for different device types based on what the server knows about the user’s browser.
Separate URLs
Serves different code to each device, and on separate URLs. This configuration tries to detect the users’ device, then redirects to the appropriate page using HTTP redirects along with the Vary HTTP header.
Google does not favor any particular URL format as long as the page(s) and all page assets are accessible to all Googlebot user-agents.
The key points for going mobile
There are key points for going mobile that you should take note of regardless of which configuration you choose to set up.
Signal to Google when a page is formatted for mobile (or has an equivalent page that’s formatted for mobile). This helps Google accurately serve mobile searchers your content in search results.
Keep resources crawlable. Do not use robots.txt to block search engines from accessing critical files on your site that help render the page (including ads). If Googlebot doesn’t have access to a page’s resources, such as CSS, JavaScript, or images, we may not detect that it’s built to display and work well on a mobile browser. In other words, we may not detect that the page is "mobile-friendly," and therefore not properly serve it to mobile searchers.
Avoid common mistakes that frustrate mobile visitors, such as featuring unplayable videos (e.g., Flash video as the page’s significant content). Mobile pages that provide a poor searcher experience can be demoted in rankings or displayed with a warning in mobile search results.
Mobile Devices Type
Mobile: In this article, "mobile" or mobile devices refers to smartphones, such as devices running Android, iPhone, or Windows Phone. Mobile browsers are similar to desktop browsers in that they can render a broad set of the HTML5 specification, although their screen size is smaller and in almost all cases their default orientation is vertical.
Tablets: We consider tablets as devices in their own class, so when we speak of mobile devices, we generally do not include tablets in the definition. Tablets tend to have larger screens, which means that, unless you offer tablet-optimized content, you can assume that users expect to see your site as it would look on a desktop browser rather than on a smartphone browser.
Multimedia phones: These are phones with browsers that are able to render pages coded to meet XHTML standards, support HTML5 Markup, JavaScript/ECMAscript but might not support some of the extension APIs in the HTML5 standard. This generally describes the browser in most 3G-ready phones that are not smartphones.
Feature phones: On these phones, browsers lack the capability to render normal desktop webpages coded using standard HTML. This includes browsers that render only cHTML (iMode), WML, XHTML-MP, etc.
New Google recommendations are geared toward smartphones, but we encourage multimedia and feature phones site owners to follow the same advice where they feel appropriate.
Adsense Placement Tips
The placement of your ads is important. Focus on creating a flow between your content and the ad placements for the ultimate user experience. Consult your analytics data to set events and understand where your users are most receptive. Here is Google Adsense Placement Tips:
When using enhanced features in text ads, decrease accidental clicks by moving the ad units a minimum of 150 pixels away from content
Peek ATF* for a great UX while maximizing revenue potential
Potential eCPMs increase when you swap 320x50 for 320x100 ad units
Anchor social links to make sharing easy
Use the 300x250 ad unit for a potential increase in fill rates and eCPM
As Google publisher shold you know the various Adsene sizes and Adsene formats specific for your mobile site such as:
Reserved for the highest Adsense paying impressions
Ad is pre-loaded
Doesn’t slow the user experience on the page
Mobile Web Guide
Engagement ‘Push notifications’ and ‘Add to Home Screen’ allow users to build deep, engaged relationships with the mobile experiences they love. Take advantage of these advanced features directly on the web without the friction associated with installing an app.
Push Notifications
Timely, personalized notifications
Make it easy to return to your site
Increase frequency of engagement with your users
Add to Home Screen
Single tap to access your site
Keep your users engaged
Build your brand
Since your Google Grants account is limited to a $1.00 max CPC, you are unable to activate
keywords whose minimum bid is above $1.00 by raising your bid. If you want to activate a keyword that is 'inactive for search', we suggest you first try optimizing your keyword, ad text, and campaign.
For example, consider adding your keyword to your ad text, or changing your campaign targeting options. Please ensure that the keyword is highly targeted and relevant, as it will be difficult to reactivate general keywords through optimization.


")